

When it comes to password-protecting pages in HubSpot you've got two choices; simple shared passwords or the more sophisticated HubSpot Memberships. The right choice depends on the purpose of the content being protected.
There are many reasons why you may want to put content behind a password, instead of simply gating it with a form. You might have content intended for existing customers, partners, or employees or content with sensitive or personal information.
If you're happy to have one password shared with everyone you want to access your content, password-protected pages can work for you. This feature is available with HubSpot Marketing Hub Pro or HubSpot CMS Hub Pro. Use this method if the information you want to share isn't sensitive or personal, or will only be live for a constrained time.
If, on the other hand, you need each person accessing the content to have their own password, known only to them, then HubSpot Memberships is the answer. This is available with HubSpot Marketing Hub Enterprise or HubSpot CMS Enterprise. Memberships could be the solution if the information is sensitive, personal to the user logging in, or you need the ability to revoke access for individuals without changing the password for everyone else.

How to use password-protected pages in HubSpot
When using password-protected pages, pick the page you want to protect and choose one password to protect it. If you're password-protecting multiple pages, you can keep the passwords the same or make them different.
The process is:
1. In HubSpot, navigate to and edit the page you want to protect.
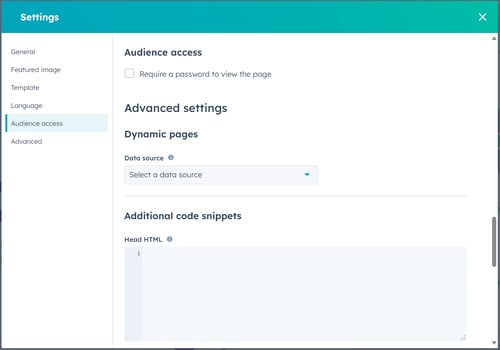
2. Open the page settings and select the Audience access section:
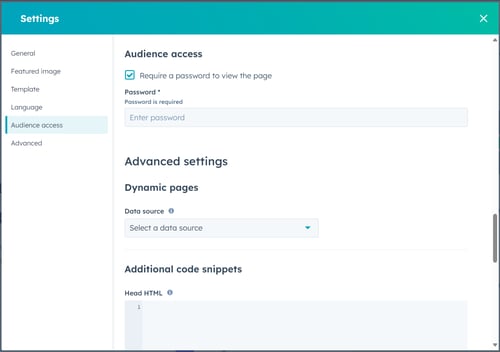
3. Check the Require a password to view the page box and enter your chosen password in the text field that appears:
4. Exit the settings window and update or publish your page.
5. Test that your password is active and entered correctly by navigating to the URL of your protected page, ensuring that the password prompt page appears and the password you created gives you access to the page.
Note: the password prompt is a HubSpot system page so the design of it is controlled by the template assigned in the system pages settings. Your developers can customise this page to match your brand and website.
6. You can now distribute the password to all the people you want to have access to the page.
How to use HubSpot Memberships to protect pages
HubSpot Memberships is more sophisticated than password protection of individual pages, so there's a little more to think about and prepare. Deploying memberships-based access requires that you use Lists to define who has access to what pages. And, since users will need to create and potentially change/reset their own passwords, you'll likely want to review the page and email templates you use.
The process is:
1. Review your templates - decide if you want to use the basic, default email templates or if you want to design and develop custom ones for:
- Registration invitation
- Password confirmation
- Password reset emails
Do the same for the page templates for:
- Registration
- Access denied
- Sign in/out
- Request password reset
- Create new password pages
A HubSpot CMS developer can customise all these templates to match your brand and requirements.
2. Review your settings - set the contact details so users can contact you if they encounter issues and configure your preferred idle timeout, if any - this will automatically log out users if they're inactive, enhancing the security of your content.
3. Prepare your lists - HubSpot Memberships uses lists to control which users can access which groups of pages. You'll need to choose or create the lists to identify who should have access to each type of content. Your lists can be static, that you manually update with new users, or active, which will update automatically with qualifying contacts.
Note: the first time that a contact appears in a list that's added to a membership page, they'll automatically receive a registration invitation email. This applies to all contacts on a list that's add it to a page and all new contacts added to a list.
Contacts who've already registered won't receive duplicate invitation emails. Instead, they'll simply be able to access any new content they're eligible for.
4. Configure your pages - as with password protection configuration, navigate to your page's settings and to the audience access section.
Select the 'Private - Registration required' option:
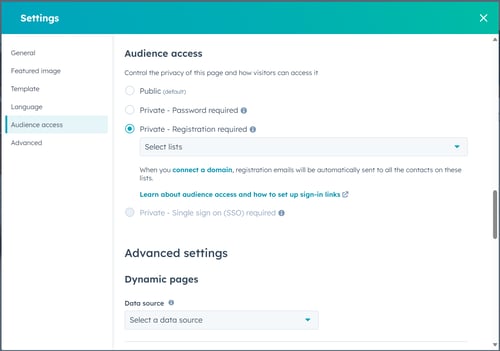
In the dropdown field that appears, now select the list that will contain the users who should have access to this page. You can use the same list on multiple pages.
5. Publish - exit the settings window and update or publish your page.
6. Test that your membership is active - navigate to the URL of your protected page and ensure the sign-in page appears. Ideally, you will have a contact in the list that can be used to test the registration invitation, sign-up and sign-in flow.

